

The BYO7 Field Manual: From Screen to Print
Screen to sleeve: a step-by-step guide to making a print-ready 7″ art print in Affinity

This is the companion deep-dive to The BYO7 Prepper's Guide. If you already know your way around a print file, skip ahead. If you've never made an editioned art print before, this walks you from a blank canvas to a finished 7″ × 7″ print you can bring to the Print Club Art Swap.
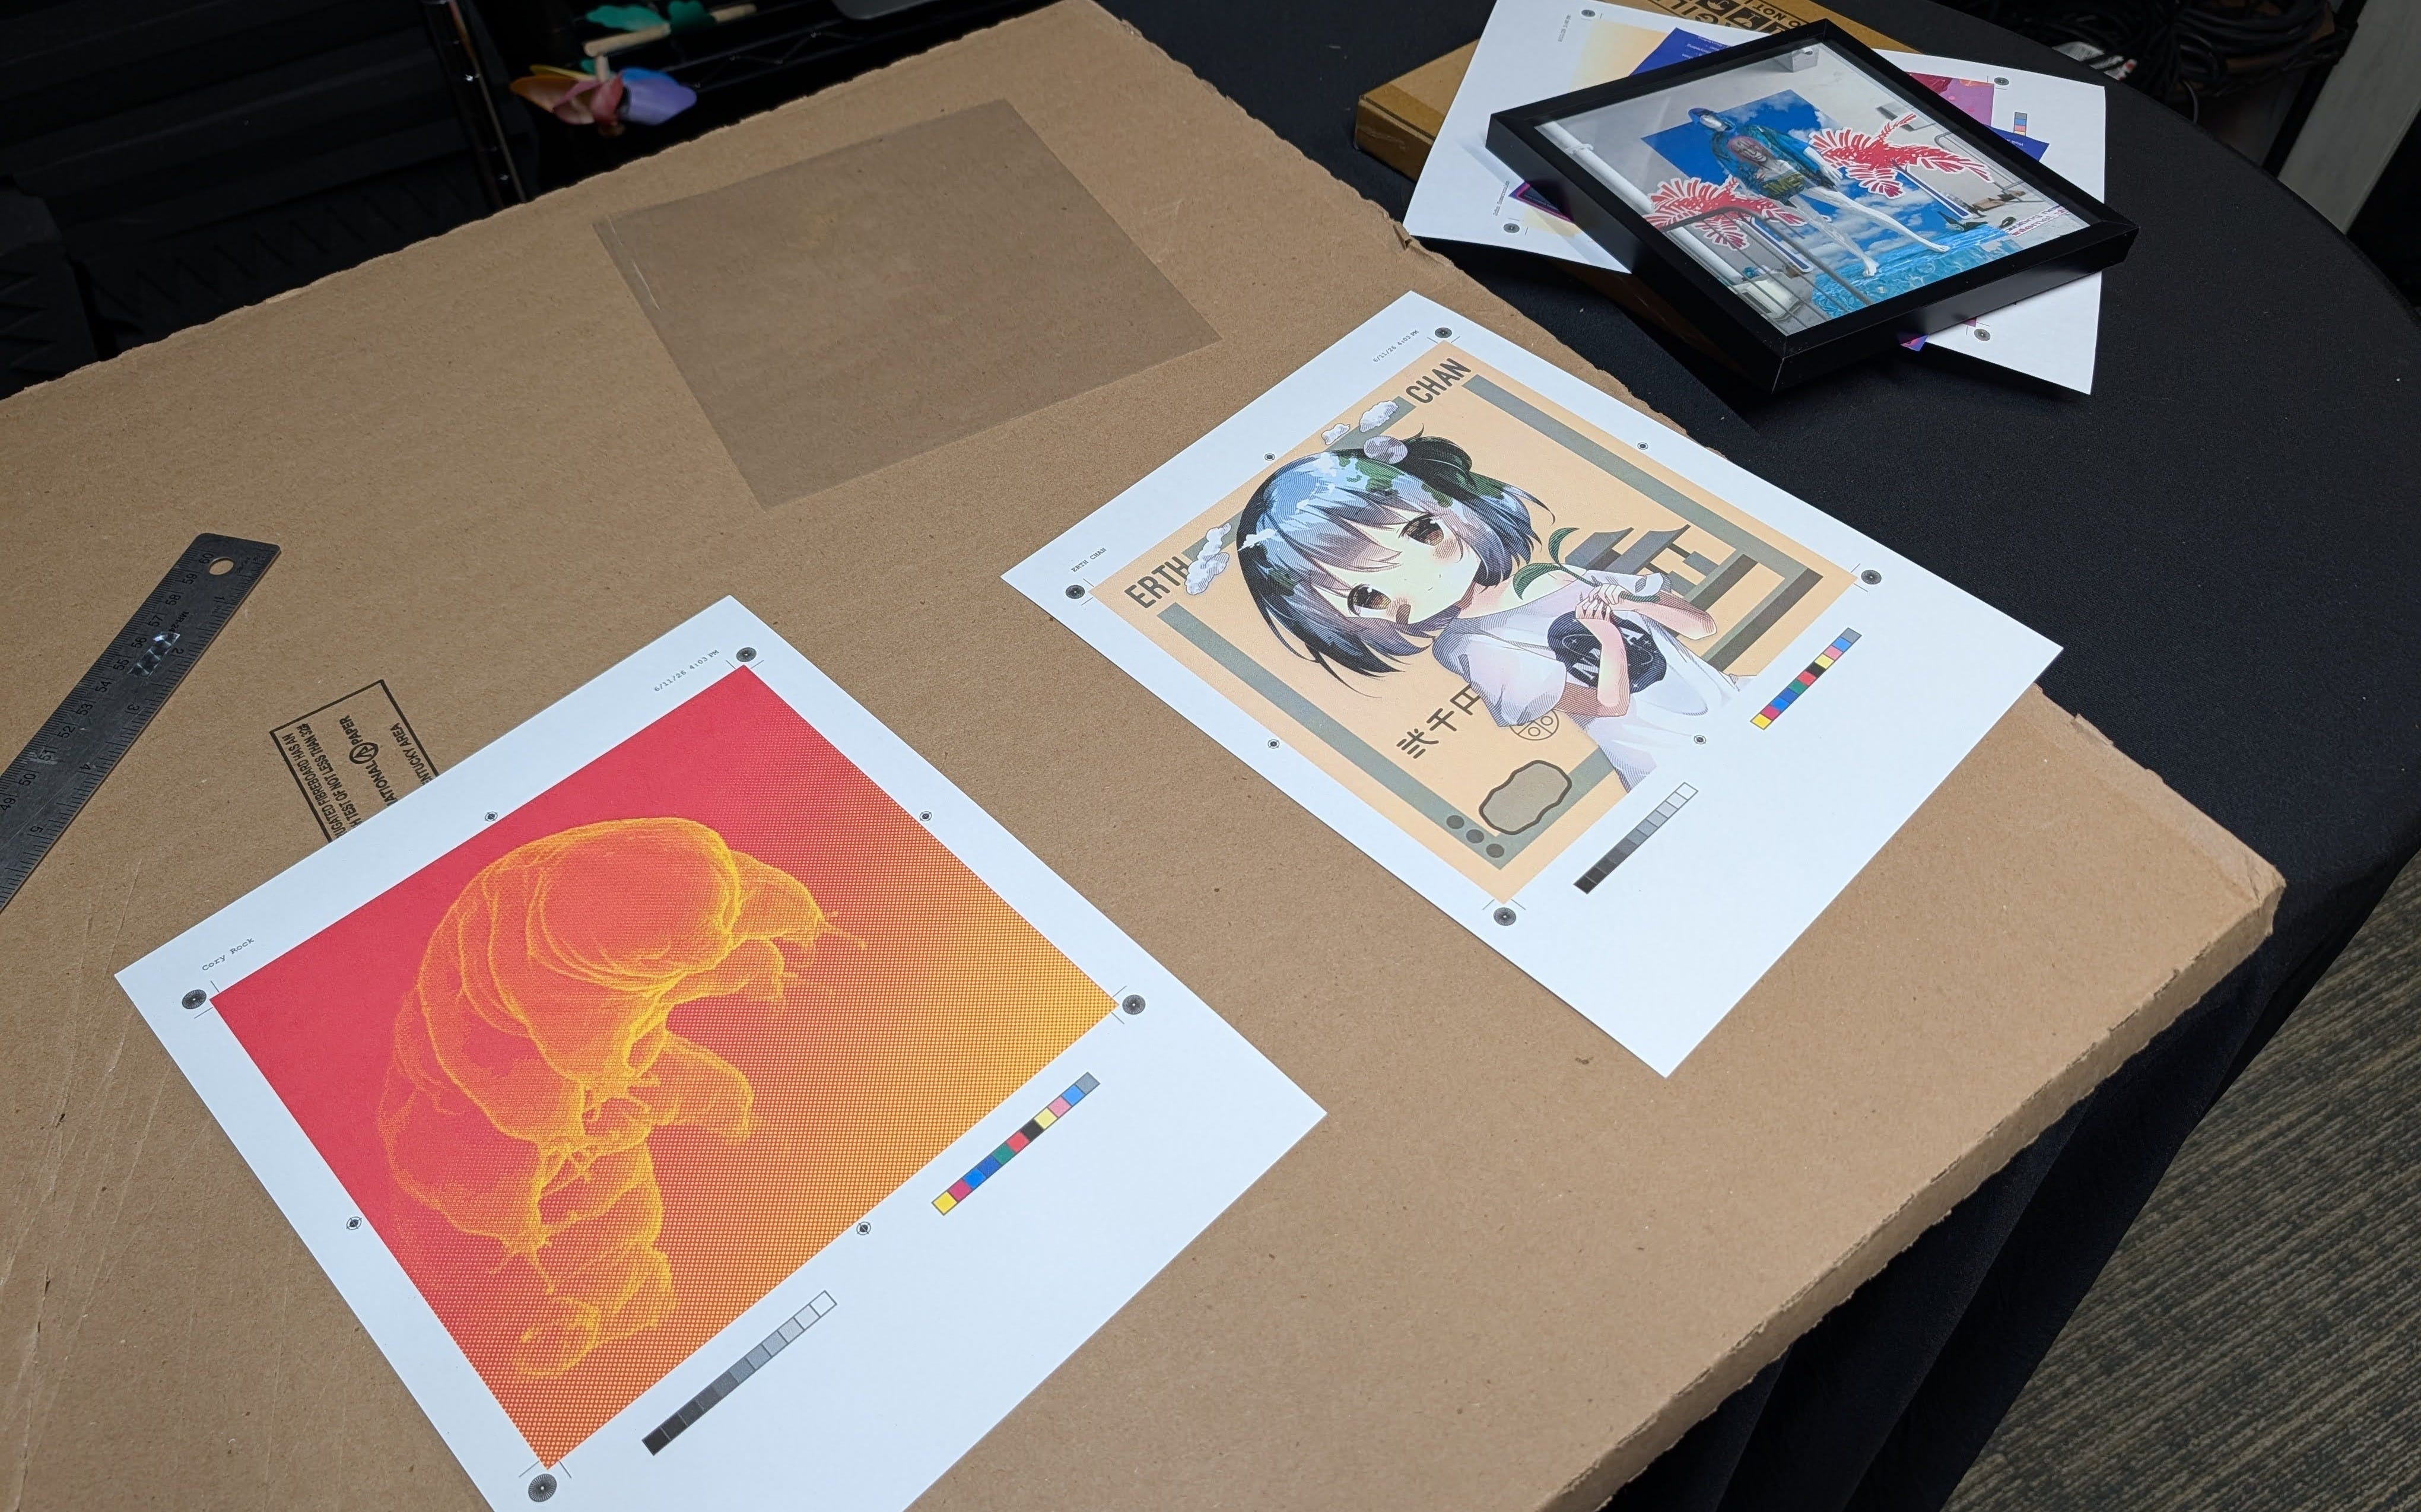
First, a big caveat: every medium and printing method is more than welcome: riso, silkscreen, intaglio, letterpress, linocut, photography, painting, you name it. If you already have a print practice, do your thing and bring it in the 7″ format.
This walkthrough is mostly for digital artists who don’t have print experience and want to get from a file to a finished print quickly. We’ll use Affinity Studio throughout, because it’s free, it runs on common desktop and laptop operating systems, and it does everything we need. (Affinity is Canva’s free, unified design app: it combines the old Affinity Designer, Photo, and Publisher into one program, organized into a Vector Studio, Pixel Studio, and Layout Studio. Any of them will work here.)
One nerdy note on printers: inkjet printing generally beats laser for art prints, especially a photo inkjet with many ink channels (some run 10–12 colors). Inkjet gives you richer color depth, higher effective resolution, and a more natural, tactile finished texture. That said, the best camera is the one that’s with you. If this is your first time making editioned art prints, don’t sweat the nerdy details. Use whatever’s easiest and get a print in your hands. You can geek out on gear next time.
Step 1 — Set up your document
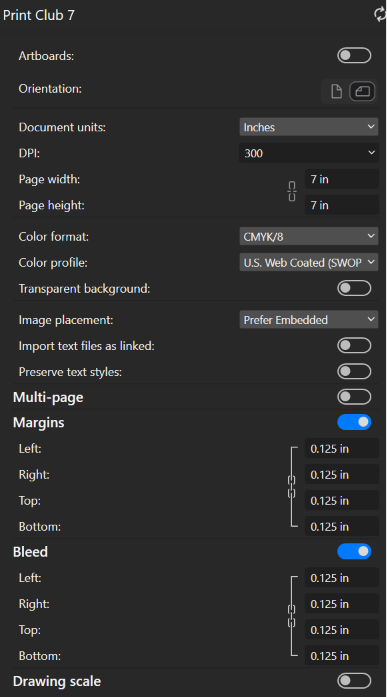
Open Affinity and choose File → New.
Set Document units to Inches.
Set DPI to 300 minimum, 600 maximum. 300 is plenty for a crisp print; 600 gives you room for fine detail and future-proofing.
Set Page width to 7 in and Page height to 7 in.
Set Color format to CMYK / 8. Printers mix physical inks in CMYK, so designing in it now means fewer surprises later.
Add bleed. Go to Document Setup → Bleed and add 0.125 in on all sides, then extend any edge-to-edge artwork out into it. Bleed gives you a trim margin so no thin white slivers show up when the print is cut down to 7″ × 7″.
Add margins. In the same dialog (or later via Document Setup → Margins), set a 0.125 in margin on all sides. This draws a guide for your safety area. Keep text and key elements inside it.
Click Create Document.
Step 2 — Create or paste your artwork
Drop in your image (drag-and-drop, or File → Place), or create your artwork right on the canvas. A few things that save first-timers a lot of grief:
Fill the entire bleed. Scale your art to cover the full page and all the way out to the bleed edge, not just the 7″ × 7″ trim. Any gap at the edge will print as a white border once it’s cut.
Know your three zones. The trim is the final 7″ × 7″ edge. The bleed extends 0.125″ past it. Let background art run all the way out into it. The safety area sits just inside the trim (Affinity calls this the margin).
Keep important elements inside the safety area. Pull anything you can’t afford to lose (signatures, text, faces) at least 1/8” (0.125 in) in from the trim edge. That protects them from slight cutting variance, and from being hidden later if the print is matted or framed.
Mind your resolution. Zoom to 100% and look closely. If your art looks soft or pixelated on screen, it’ll look worse on paper. Place images that are at least 2140 px across (roughly 300 DPI over the 7″ print plus a little bleed).
Watch your colors. Because you’re in CMYK, ultra-bright RGB neons and glowing blues may look duller than they did in another app. That shift is normal, nudge saturation to taste so the print matches your intent. For large solid-black areas, a “rich black” (e.g. C40 M30 Y30 K100) reads deeper than plain K100.
Step 3 — Add your finishing touches
This is optional, but collectors love it: consider signing your piece, numbering the edition (e.g. “3/10”), and adding a title or your handle somewhere on the front or back. If you add type in Affinity, keep it inside the margin, and when you’re happy, flatten or rasterize any special effects so they print exactly as you see them.
You don’t have to do this in the file, though: signing and numbering by hand after printing is classic and adds a personal touch. Just make sure your pen or marker doesn’t bleed through to the front of the paper: test on a trimmed-away scrap first before numbering your actual prints.
Step 4 — Proof before you print
Zoom to 100% and scan every corner for stray pixels, cut-off elements, or low-res patches.
Double-check spelling, your signature, and edition numbers.
If you added bleed, confirm your background actually runs all the way into it.
Step 5 — Export a print-ready file
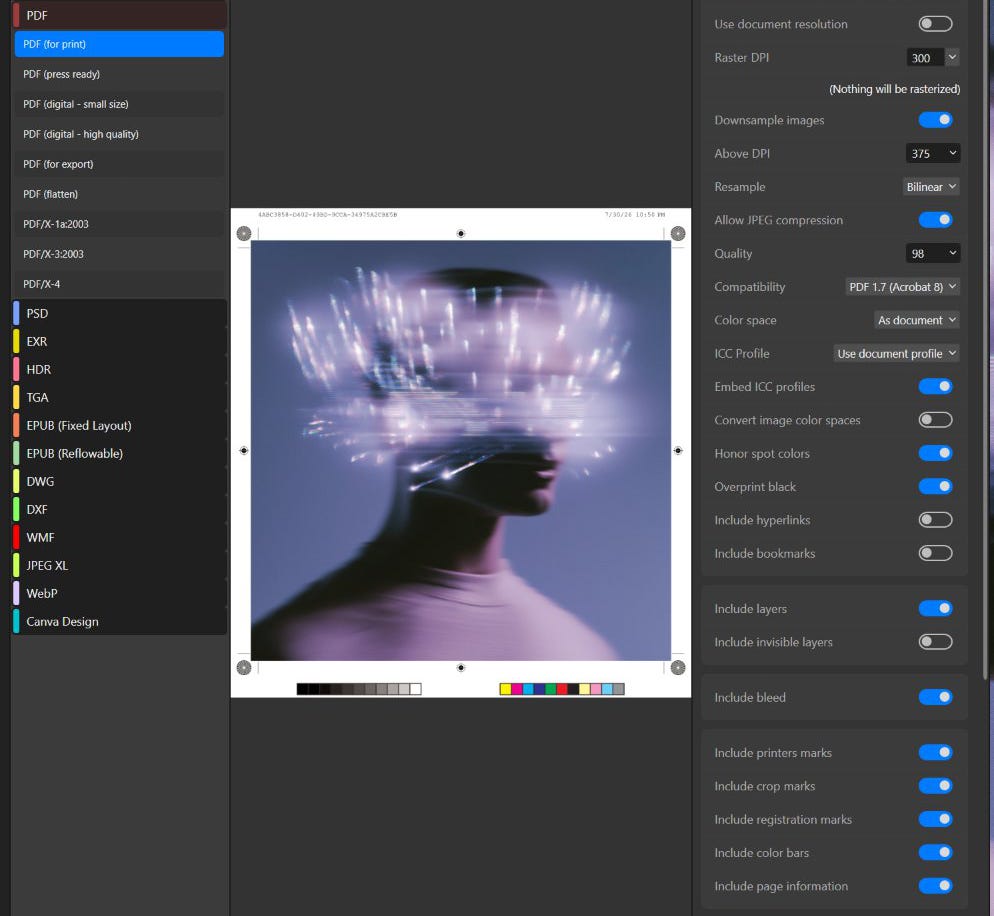
Go to File → Export → Export… choose PDF, then the “PDF (for print)” preset.
Turn on Include bleed and Include printers marks (crop and registration marks). The bleed carries your art past the trim, and the crop marks show exactly where to cut — together they make trimming down to a clean 7″ × 7″ easy.
Keep Raster DPI at 300+, embed fonts (All Fonts), and leave the color space as your document (CMYK). Then export.
Save your original Affinity file too, so you can make more editions later.
Getting it Printed
You’ve got a file. Now make it real. Two solid paths, depending on your gear and budget:
Option A — Print at home
Use good paper. Matte or photo cardstock in the 200–300 gsm range feels substantial and holds ink well — thin copy paper reads as a flyer, not a collectible. One catch: not every printer can feed cardstock, so go with the heaviest weight (the biggest number) your printer is rated for. Most office printers handle it just fine but you may just have to sweet-talk your office manager into ordering some cardstock or coverstock, or simply bring your own.
Print the PDF at actual size. Print your bleed-and-crop-marks PDF onto larger paper (8.5″ × 11″ works well). In the print dialog set scaling to 100% / Actual Size (never “Fit to Page,” which quietly resizes your square). The crop marks print just outside the artwork.
Trim to the crop marks. With a ruler and a sharp blade, cut along the crop marks for clean, edge-to-edge 7″ × 7″ prints. Because you added bleed, color runs right up to the cut with no white border.
Use the best quality setting and let each print dry fully before stacking, so ink doesn’t offset onto the next copy.
Run your 10 copies (or however many editions you want), and you’re swap-ready.
Option B — Order from a print shop
A quick heads-up: different print shops have different file requirements. Some want no printer’s marks, a specific bleed amount, flattened PDFs, or their own template. So you may need to re-export to match. The print-ready file we set up above is aimed at printing yourself, or at office / quick-print shops that don’t trim for you. If you’re using a shop that trims and finishes, check their spec sheet first and re-export to fit it.
Choose a shop. A local print shop, a neighborhood riso or screen-print studio, or an online printer all work. Online “flyer” or “print” products can usually be set to a 7″ × 7″ custom size.
Upload your PDF (the print preset from Step 5). If you added bleed, tell them the trim size is 7″ × 7″.
Specify the stock. Ask for a heavier cardstock (roughly 250–350 gsm / 100–130 lb cover). If matte is an option, go matte. It kills glare and gives that gallery feel (a satin finish is a fine second choice).
Order your run. Ten editions is a friendly, safe number if you’re unsure.
Give yourself lead time so your prints arrive before the swap.